
This post turned out to be a little technical, but I was fed up spending hours searching the internet on “how to point a French barn”, and finding unhelpful comments. So to put my money where my mouth is, so to speak, I decided to write a post. Bare with the length of this article – its a long job and I wanted you to feel the pain! 🙂
Living on the preverbal shoe string at the moment, the renovation is being carried out solely by my husband Tony and me. We spent six months last year and the year before cleaning brambles and wild weeds and fixing up La Petite Maison to live in – bit like glamping as it had a roof but no hot water or heating, although as of this month we have a wood burner and a hot shower, and finishing the out buildings so we could actually have a place to cut wood, restore furniture and store materials out of the rain.
We also started clearing and renovating the garden between the meadows and almost completed the ornamental veggie garden with raised beds [ see post on tomatoes], planting our first crops and with beginners luck having a glut of potatoes, tomatoes and chillies. We bought our vehicles to France and begun registration, so the only thing left was to get on with Le Grange – the barn – our home and some serious hole filling!
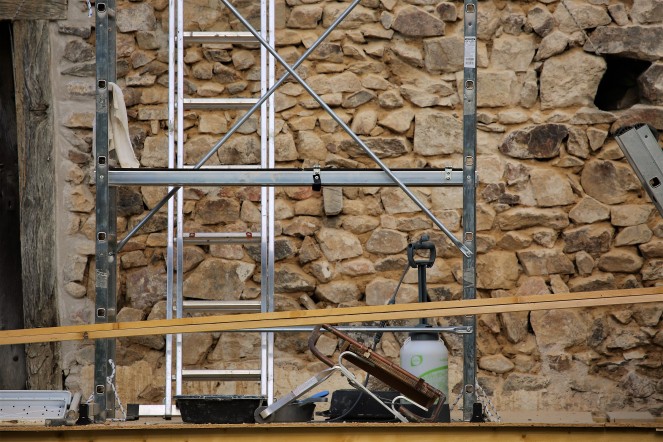
So how did you learn to point a barn? My neighbours looked impressed and wide eyed as they spotted me up the local farmer’s ladder, balanced on a timber decking, tapping away at the crumbling stone jointing. I get vertigo, so even I was impressed.
When my Dad wasn’t working in the City of London as an insurance broker, he renovated his 1930’s home and me being a tom-boy liked to help. From the age of three getting dirty was fun, and later working with noisy power tools and doing what boys did, was and still is my passion. My ex-husband was an engineer and I used to go on site a lot and picked up copious amounts of useful information along the way. But pointing a barn is not so very technical and needs no special courses or experience – just patience and thoroughness and the right mortar mix.
Our barn is not huge, but will likely take six months of solid work to complete all the pointing. After the initial preparation stage [see below], the ideal time to point is in the morning before the heat of the midday. Do not point when frosty, so end of March can be a starting date. From end September it rains, and you will need to cover the pointing. The mortar takes approx. three to five hours to harden enough to brush and finish, so best not to commence new pointing too late in the afternoon, or you will be finishing with the owls for company.
Preparation – cleaning


The first exploration of the stonework sent lizards and spiders scurrying away. Sets of little wide eyes in the crevices blinked, bags were packed and homes evacuated.
Loose stones revealed holes stuffed with straw and twigs, cosy spaces for baby birds to be born and safe for the local moggy, a large tabby cat who had evidently grown very fat on country mice and sparrows.
Health and safety in mind, I donned a bike helmet, jeans, jumper, gloves, safety boots, glasses and breathing mask. Feeling slightly sweaty with my glasses misting up, it was time to get on with this mammoth task and make progress. The bike helmet turned out to be very necessary. One chipping session bought down a large stone onto my head and after being a little bit slack about wearing it, as hot, as uncomfortable sometimes, I quickly changed my mind. I even eat my lunch in it, so I don’t forget.
Walls are usually repaired in two stages – jointing then pointing. Jointing is the first fill for deeper holes and crevices with pointing being the final fill to surface and sometimes decorative. For the barn, being a delicate creature, and not wishing to dislodge too much stone, joints will be raked out only to a maximum 3 cms and the jointing and pointing can be done in one go. Very large gaps should actually be repaired with stone first, rather than stuffing in lots of mortar. Clean out the gap, find a stone that fits tight and may actually need to be slightly tapped into place, then mortar in place, leaving the edge to be pointed up with the remaining wall. I like to make new stones work a little. Just popping them loosely in the hole is not ideal as you then rely on the mortar to support the face of the wall. With a bit of wiggling and tap with a hammer, often my new stones will stay put and not be easily removed, and that’s perfect.
The walls appeared sound, but evidently stayed up due to weight, as the jointing was now sand and a slight prod with a chisel sent it pouring out like the sand user to close a Eqyptian tomb. Gingerly loose jointing was carefully removed and everything else, left as found. Taking a small chisel and hammer, every joint was cleaned back 1-3cms and loose jointing removed. The aim being to leave a small ledge on each stone to accommodate the mortar, to help it stay put and not fall out. One very large stone was loose and seemed to be filled round with earth, not jointing. With a small crowbar I levered it out. In an instance the wall was smothered with a thousand ants, pouring out as the light lit up their home. The panicking ants swept up baby eggs and in a co-ordinated exodus rushed for a nearby gap in the stones as I puffed away with the lime. I felt horrible being so destructive but this had to be my home and the ants had so many more places to go too. An hour later the hole was empty – not an ant in site. The room was at last free from a very lively bunch of insects and other country visitors.
Standing back after six hours of chipping, left the stones neatly isolated and mortar free and ready for washing down. First a soft bristle brush was used to clean out the loose dust and particles, and then with a garden sprayer, working from top to bottom the joints were washed out, making sure the stone surfaces well wetted and free of dust and to give the stones their first clean. The water will help suction, the sticking of the mortar to the stones and bond better. Before pointing another spray of water will be done and maybe during the process. Any dry areas will not stick and later will weaken the walls as they will let in rain.
When neighbours see the walls all chipped out, they seem worried they might collapse, but to be honest they won’t, well not for a few months, but I wouldn’t risk a winter, with storms, high winds and frost. But a week or two if you want a break will be fine.
Tools and mortar mix


Now for jointing/pointing – we need tools and the secret ingredient – lime mortar. This elusive mortar seems to stress everyone and the internet forums are crammed fall of the same question that more often than not goes unanswered. What do I point my French barn with? What ratio of sand and lime? Should I use cement? Well all will be answered, but first tools – what you need to make this job very easy.
-
- Buckets as easy to handle, holding water, sand and lime to hand. We ordered in from Gedimat the sand and lime and leave this undercover from the rain and I take what I need for the days work. Also for higher areas, these buckets easy to carry up the scaffolding.
- Gloves and safety glasses. Gloves all the time as lime burns the skin. Ideally thin, waterproof. I have cotton backed rubber ones. Goggles especially when mixing as the lime is very powdery and a breathing mask too. Once the mortar is mixed you can dispense with the mask. Talking of burns – I had a leak in my glove and the lime got in and water and I ended up with very sore wrists and fingers. Proper burns, no skin, very painful!
- A large rubber tray for mixing small batches of mortar. Brico-Depot has a good sturdy one and being heavy rubber, it stays put when you use your spade for mixing.
- A spade to mix the mortar, small trowels to point with, a mortar board to put the mortar on and carry to the joint to be filled, damp clothes, a garden sprayer to damp the wall prior to pointing and a “Frenchman”, a slim pointing tool that I find great for pushing mortar into the joints when finishing. Or as we do, use your fingers as the stone will not be in perfect lines.
- A soft wire brush for final work.
The mortar mix
Now here is the mix that satisfies most barn pointing works. You should read around the subject. Point some trial patches and check what your local building pointing shades are. Ours are creamy and therefore need a dark orange sand for the white lime.
Do not add cement. It weakens the mortar. Lime is strong, flexible, and breathable. Cement makes the mix brittle, and in exceptional circumstances, ie walls exposed to harsh weather conditions, use in a ratio of one cement to three lime minimum. But not for your average French country barn. If you have to add cement – a good Portland cement – Optimat Multi Usage is fine – II/B-LL 32.5 R.
I recommend lime from “Saint-Astier” – Chaux Pure Blance LC – NHL3.5. The lime costs approx. 13 Euros per bag. That is pure white lime. The bags come in 35KG and it is very white, soft and makes a creamy mortar. Calcia Renocal produces a slightly too softer mortar and Lafarge Tradifarge is not so elastic/workable. The Saint Astier gives a pliable mix with enough time to work into the joints and finish.
The sand is fine and has good water retention. Gedimat supplied a red sand with fine particles. It holds water well. It is Sable type 0/1 and cost for 1.2 tonnes approx. 75euros.
Sand shades:
Sable blanc – white
Sable Roux – red/ochre
Sable Casse – beige
Sable Riviere – grey
Try to find Grade 02. It’s fine, so more surface to bind the lime too plus its a smoother mix, runs better into the stone and once dry has no ‘pores’ which are air bubbles that you partly eliminate when you wire brush at the end.
So the magic numbers. The mix is 1:2, being 1 parts lime [chaux] to 2 parts sand [sable]. So here is a quick matrix.
1 bucket of lime with 2 buckets of sand
2 buckets of lime with 4 buckets of sand etc…
I use an old large baked bean can and measure 1:2 with that. If you used a 1:3 mix this will be more sandy, slightly weaker, but having researched older buildings, 1:2 or 1:2.5 ratio was normal. Maybe another report after the harsh winter, and a close inspection of the walls will be worth another post.

Thoroughly mix the lime and sand together to ensure consistency in the mix, then you can add water. Mix a little water at a time till you have a quite thick mixture that you can take a piece and roll into a ball in your hand and it doesn’t collapse. It should be sticky and easily placed into the joints without falling out. It should be easy to smooth round the stones and not pull out as you use your trowel to fill and poke mortar deep into open recesses.
Now re-wet your wall area approx. 5 minutes before working. When you start, more mortar does end up on the floor than on the wall. Master mason takes practice, but the barn you point will take ages and you will be brilliant in the end. And yes it is ok to scoop up some mortar in your hand, and throw it hard at the wall. This method is good to get in deep crevices and holes, the mortar actually stays put and you reach parts you couldn’t with the trowel. Its about filling the gaps and whatever works, you can use. Don’t fuss about with smoothing just yet. Get the mortar in, the more you put in the more it helps stick the next piece. Work with urgency and if the stones dry, spritz with a little water.
Once the joints are filled, take the trowel and smooth the joints ensuring they touch all the stone faces and there are no gaps. The Frenchman tool is good to give a final press on the mortar to ensure firmly in place. A quick smooth with your finger in a glove will save you hours of hard wire brushing later. Leave the mortar to cure for around three to five hours, but I check every hour to ensure it doesn’t dry to quick if the weather is hot. I set an alarm clock as I have been known to forget and then it’s a panic to get a good finish, if at all.
Once the mortar is firm to touch but has a slightly crumb service when rubbed, you are ready to wire brush. The brushing should be dusty. If mortar sticks to the brush, it’s too wet. Leave for longer.
Wire brushing cleans the lime off the stone faces, ensures the mortar tight to the stones and leaves the mortar free of small particles and the part I like, brush marks, a bit of texture. It also closes the pores of the lime, ensuring the surface is closed so to speak before the final hardening.


Once complete, leave well alone. It will take a few weeks to cure and become strong and durable. The neighbourhood will give you copious praise, local car drivers will slow down to admire your progress and you would have given another old crumbling building a new long lease of life – well done. Just another five months to go – can you pass me that trowel.

Praise the Lord and pass the tambourine for an informative and clear piece about pointing with lime render. We have struggled and struggled to find anyone that can explain in anything remotely resembling straightforward prose rather than some sort of garbled ‘tongues talk’ and who isn’t afraid to put their money where they mouth is. Or no money (understand that one on a budget of dust and air for the Reno of la Maison Carrée) …. all hail the helmet by the way because we do not want you to be stopped in your tracks by a falling piece of loose toothed masonry. All hail your dad for being bold enough to renovate his house when you were a sprog and therefore give you the opportunity to absorb vital lessons as a tot and all hail you both for going about this with verve and common sense and being decent enough to pass both the energy and the prosaic intellect on. Chapeau and I wish you such good weather for the rest of the project. Don’t know how much it snows in the Creuse …. 😉
LikeLike
Hi praise indeed! Thank you. I wish my Dad was still around to help with this project. He would have loved to get stuck in and I could also have wheeled him off into the garden to work on that too – another mutual passion of his and mine. He passed away in 2009 and never got to see what we have here. I also didn’t manage to see him as much I should have in the last years of his life. I inherited all his tools and tonnes of squirrelled materials he accumulated over the years and it enabled u to renovate our Little House almost entirely. It was uncanny how everything found a place. We now have a water leak problem – but with the same boldness we are getting stuck into You Tube videos learning about soil mechanics and foundations. But my incentive is simple – my neighbour loves whisky and I love wine, so the barn must progress so he and I can celebrate a job well done!
LikeLiked by 1 person
I do know how you feel. Dad died 14 years ago but I know had he still been here he would have been over at every opportunity to ‘help’ and the lure of snow would have been too much for him to resist in winter. That you have his tools is a wonderful gift from your Pa. The French love for Whisky amuses me greatly – chin chin to you both and enjoy the journey to the well deserved bevvies!
LikeLike
sounds like a lot of very hard work but rewarding I’m sure.
LikeLike
It is rewarding. Not just for us but our neighbours. For many, many years they have overlooked a derelict building slowly being consumed by brambles and land long lost in a tangle of weeds and overgrown nature. The old lady next door had even lost her view across the fields – just a wall of eight foot brambles in the way. Now she has white painted fences, a garden and a view between the oak trees to the meadows beyond. Its lovely seeing her look so thrilled when she pops over to inspect our work and catch up. She is 86 and I am sure if I could speak French I could find out some very interesting gossip about our little hamlet.
LikeLiked by 1 person
How lovely for her to see her landscape changing . Hope you get to be able to converse with her.
LikeLike